-

Qualtrics Platform -

Customer Journey Optimizer -

XM Discover -

Qualtrics Social Connect
Directory Options
About Directory Options
Directory options is a dropdown menu that can be found in the upper-right corner of the Directory Contacts tab. It contains many important means of managing your directory contacts, such as the ability to export them, to set up automatic rules for list enrollment, merge duplicates, and manage embedded data.
Export Contacts
You can export all of your directory’s contacts in a file format of your choosing.
- Click Directory options.
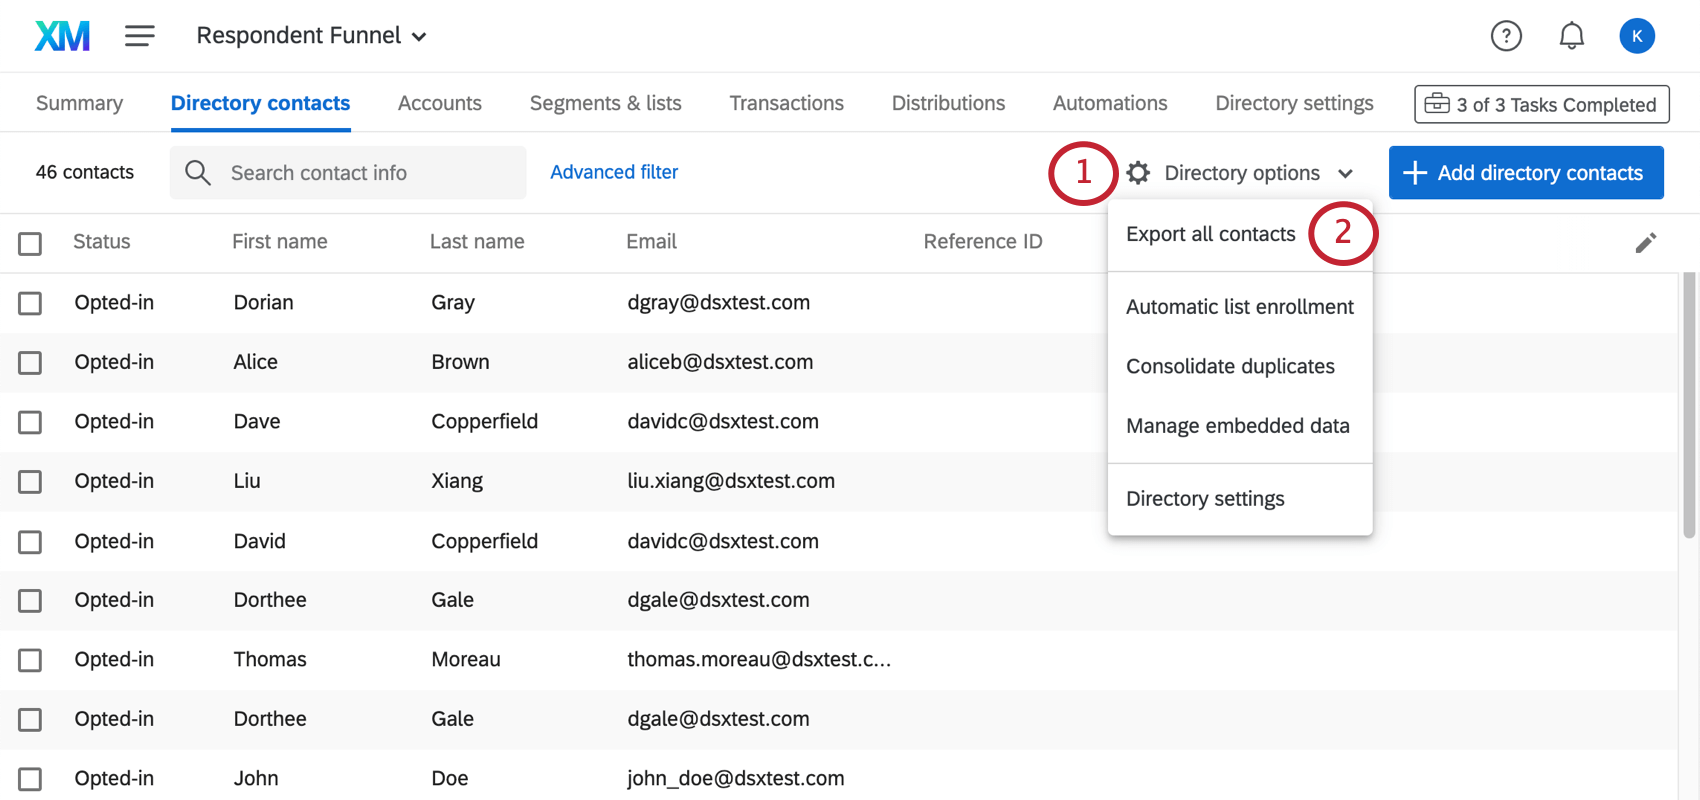
- Click Export All Contacts.
- Select a File Format. You can select either CSV or TSV.

- Choose whether to Export Contact Stats. This is information about contact frequency, response rate, etc.
Qtip: Contact stats include the invite count, email count, average response time, response rate, last invite date, last response date, and response count. Response count includes incomplete but closed responses. Average response time is in milliseconds.
- Choose whether to Export Embedded Data. Yes exports all embedded data, No exports none, and Specify Embedded Data allows you to choose which fields to export.
- Click Export contacts.
Specify Embedded Data
To specify embedded data, simply select fields from the menu on the right. Selected fields are along the bottom of the menu.
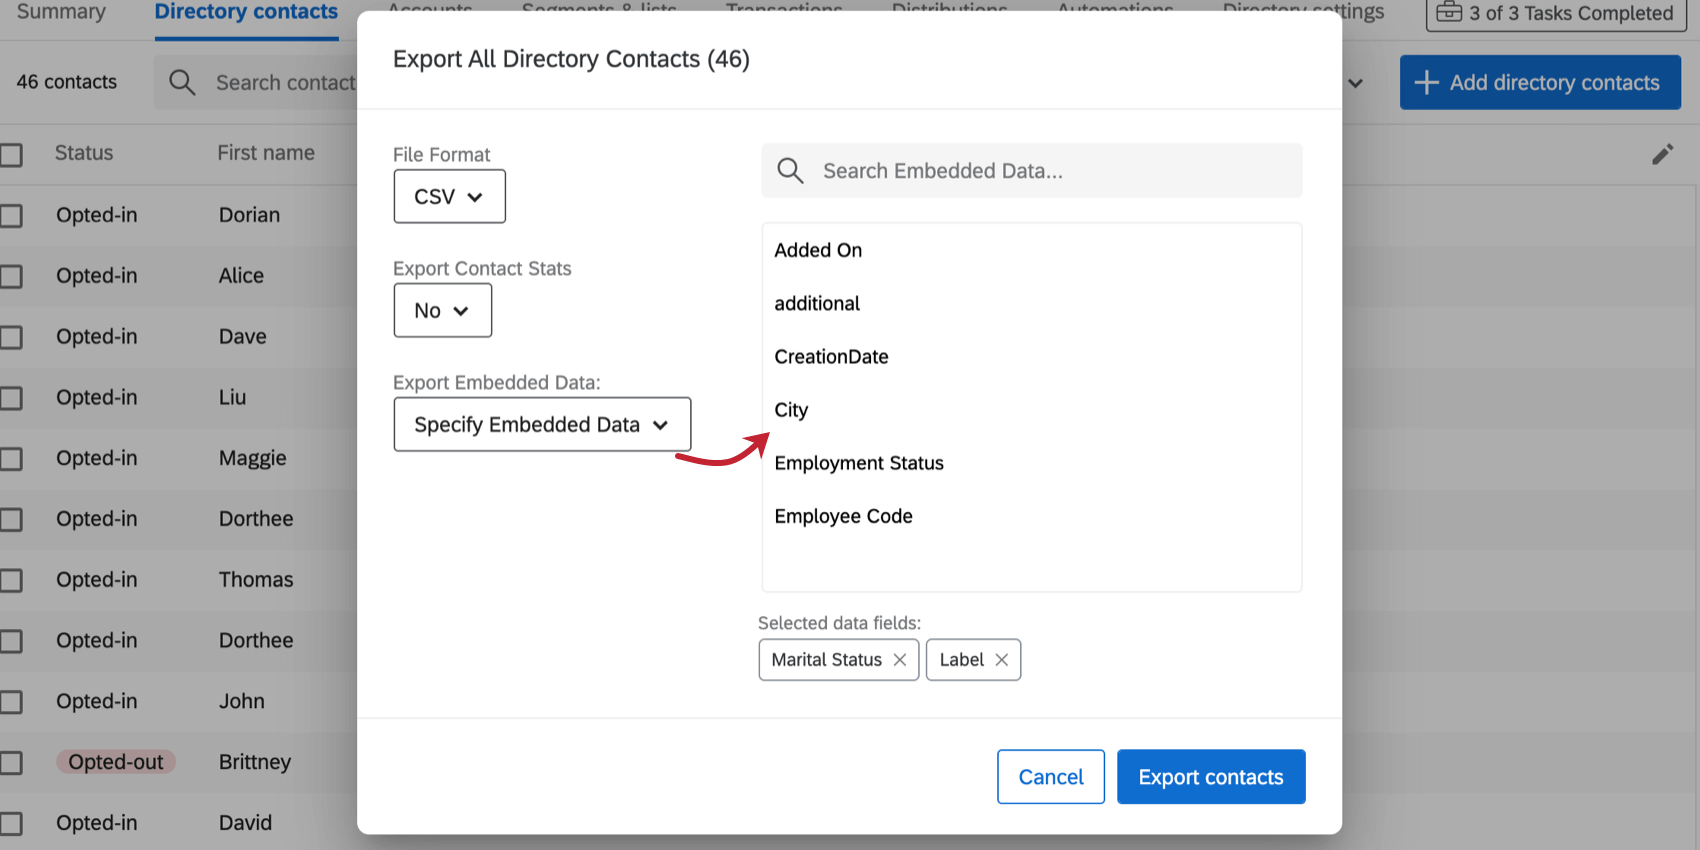
To remove fields, click the X next to their name.
Automatic List Enrollment
Say you have an ongoing survey that you run for several different cities. You get a lot of people requesting to be added to these surveys and wish you could upload them all at once to your directory instead of in separate contact lists.
Automatic list enrollment allows you to automatically sort new contacts into certain lists based on various information about them. This feature affects existing contacts, but existing contacts need to be updated for the automatic list enrollment rule to take effect.
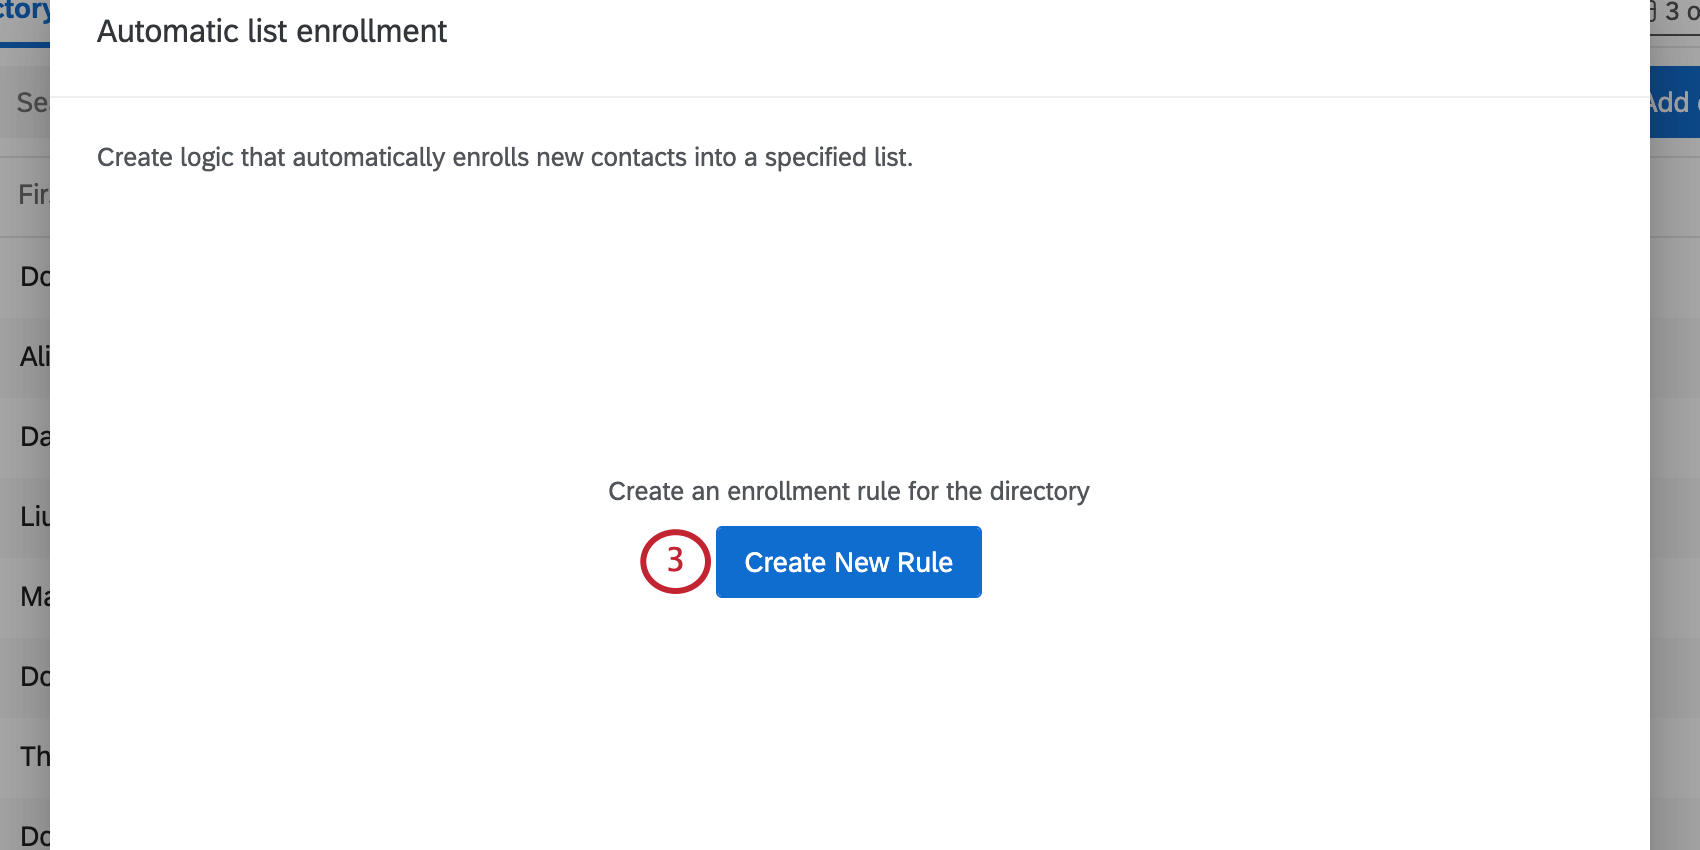
Setting Rules
- Click Directory options.
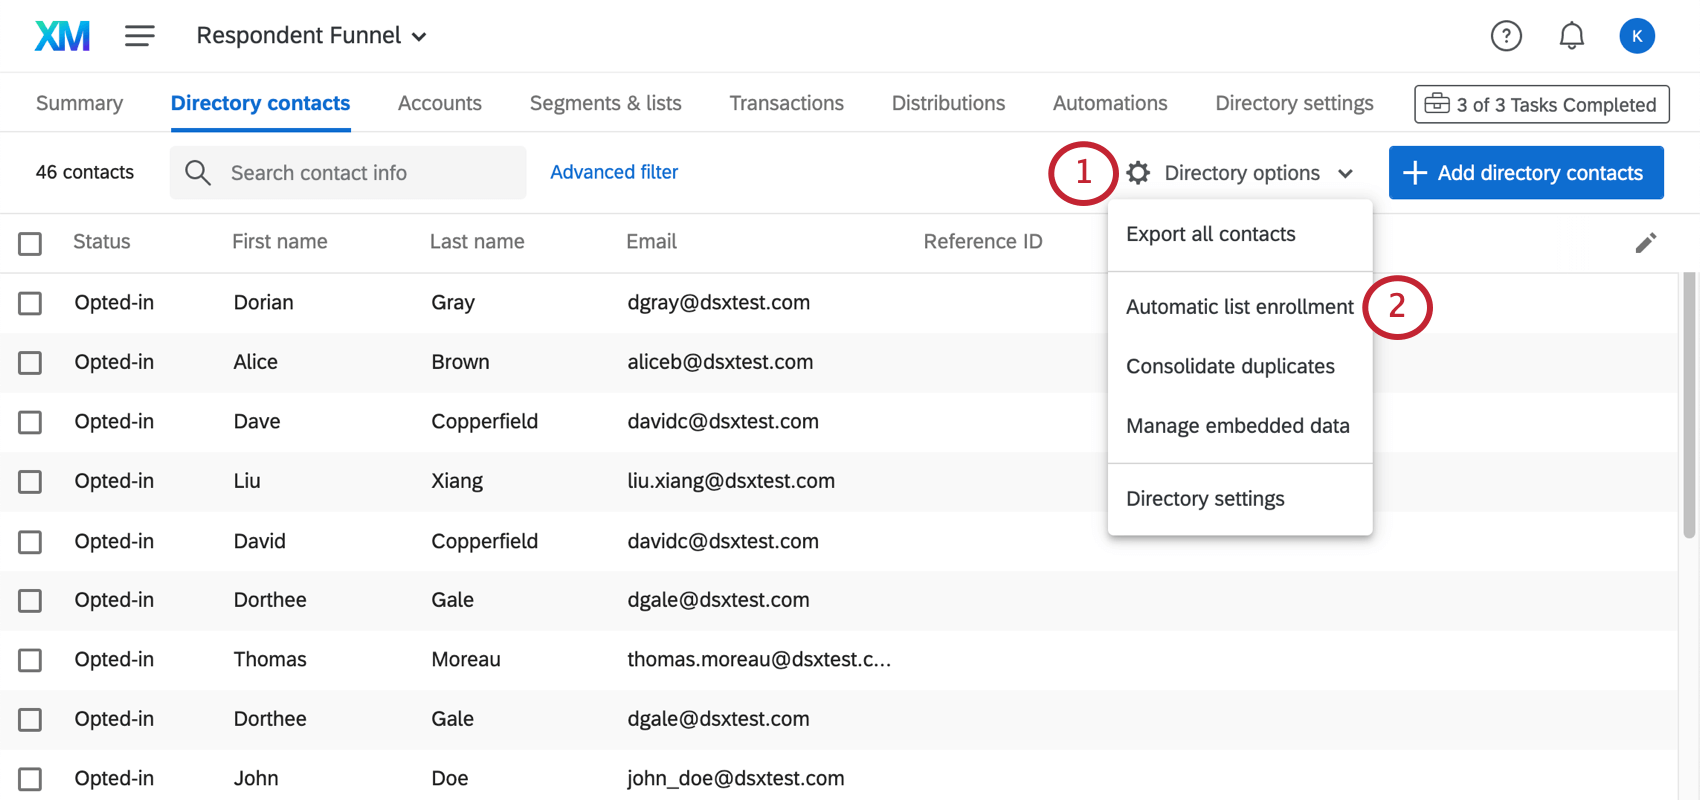
- Select Automatic List Enrollment.
- Click Create New Rule.
- Select the mailing list you want to add the contact to.
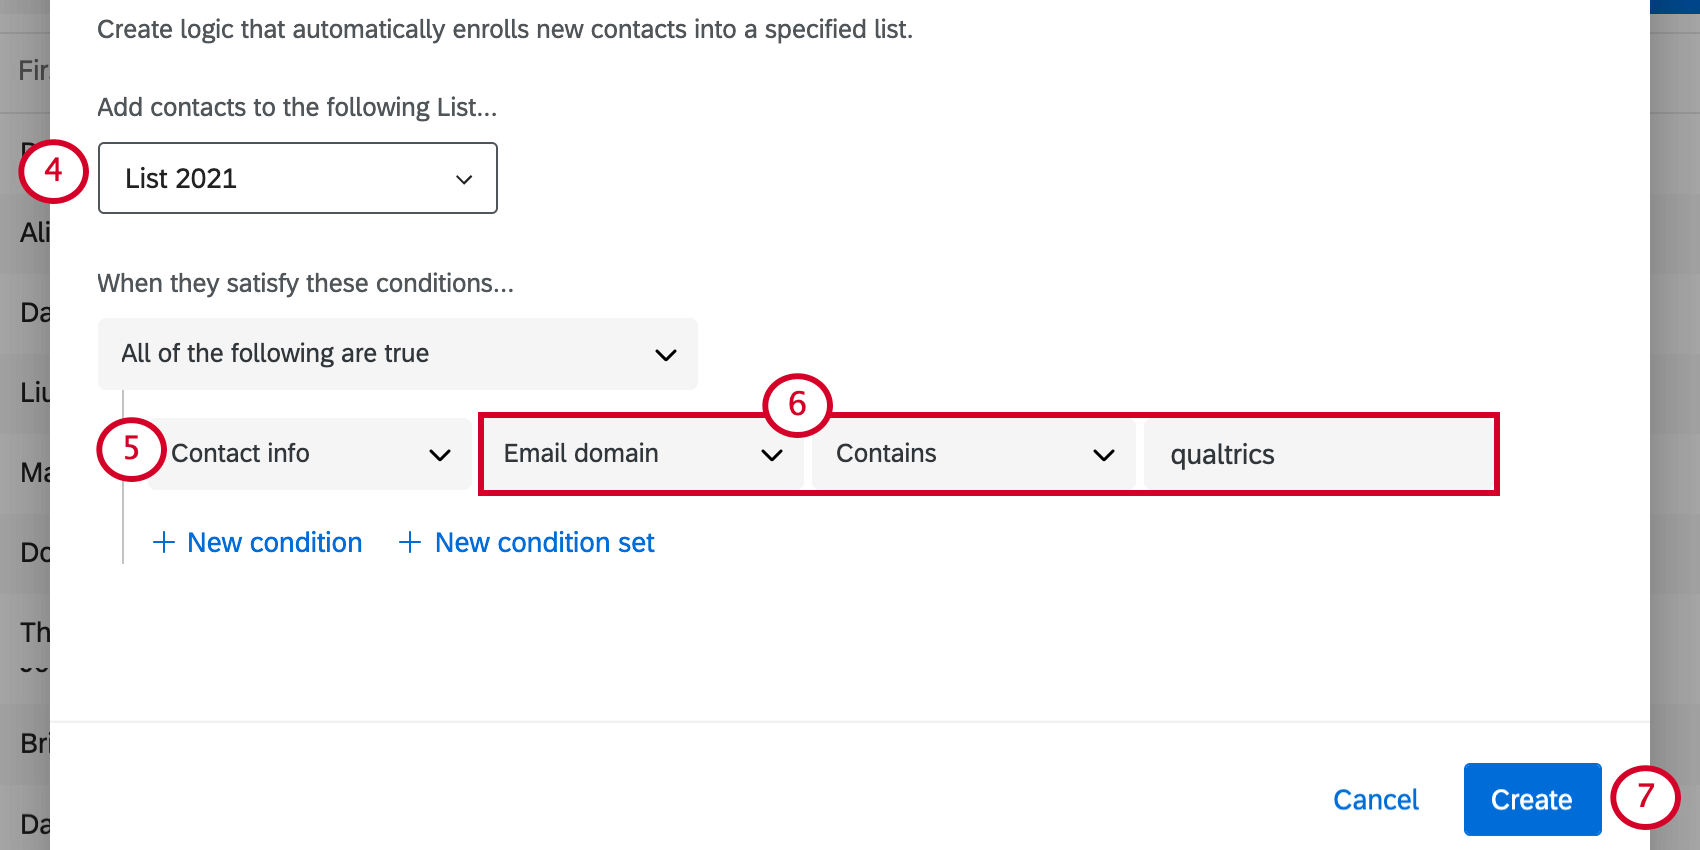
- Select the type of information you want to filter by.
- Finish the “statement” based on the specifics of that information.
Example: Here, we only want people whose email domains contain “qualtrics” to be included in our mailing list.
- Click Create to finish.
Setting Conditions
Conditions in automatic list enrollment are similar to conditions in directory filters. The only difference is that the only fields you can base automatic list enrollment on are contact info and embedded data.
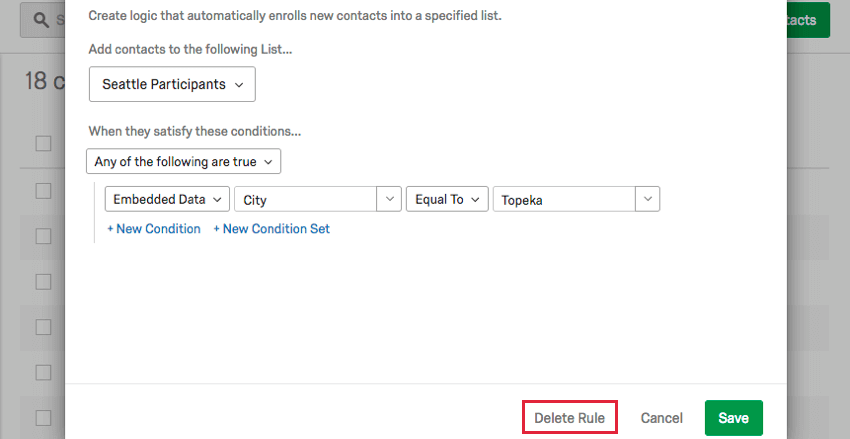
Managing Rules
After you have created rules, you will see them whenever you select “Automatic list enrollment” from the directory options.
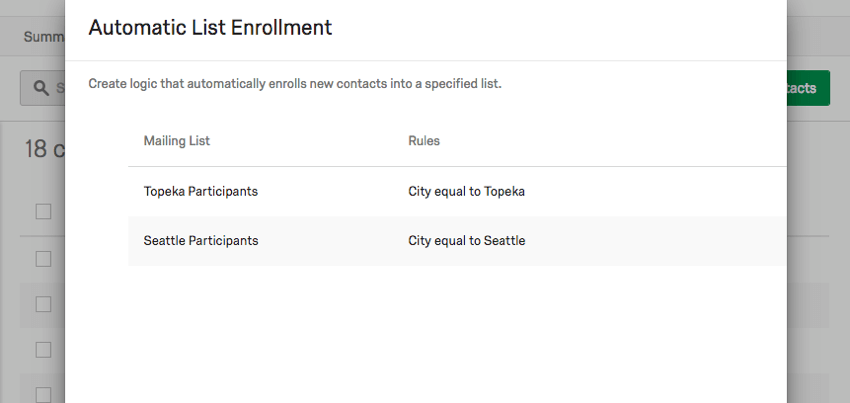
Click on a rule to modify it. You can also click Delete Rule on the bottom-right to delete it forever.
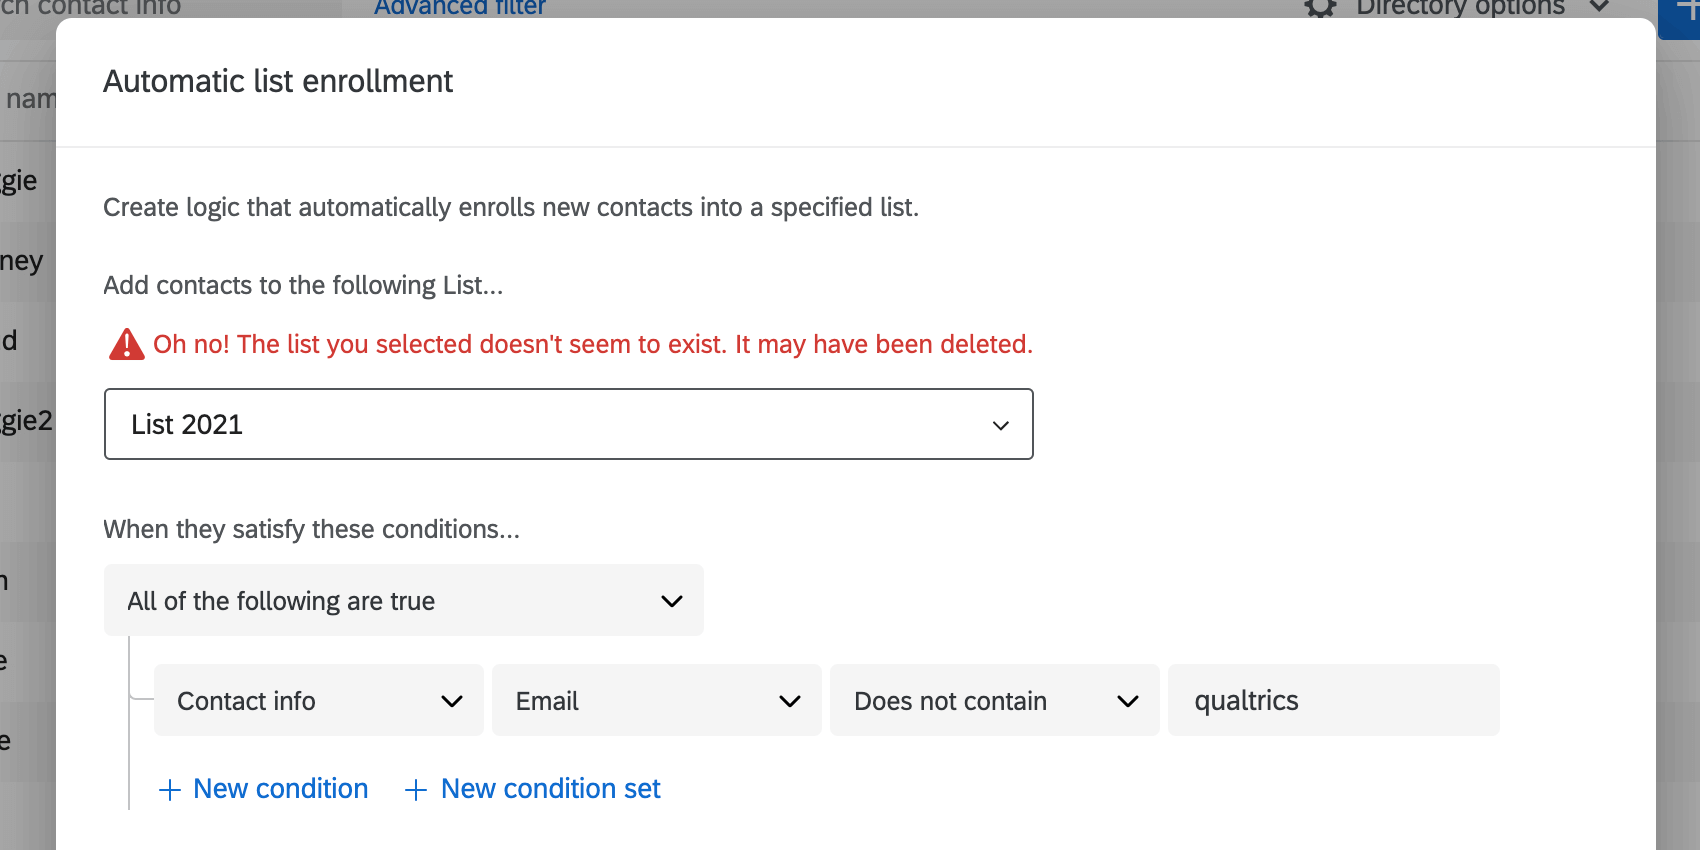
Qtip: You may see an error stating that list selected doesn’t exist. It may be that the list was deleted, but before you change anything, keep in mind that another directory administrator may have created this rule, and the reason for this error may be that you don’t have access to the mailing list.
Consolidate Duplicates
At times, you may upload multiple copies of the same contact to your directory without knowing. You can combine these duplicates into one contact by using Consolidate duplicates in the directory options.
- Click Directory options.

- Select Consolidate duplicates.
- Select fields along the left that you want to search for duplicates of. You may select up to two duplicate fields.
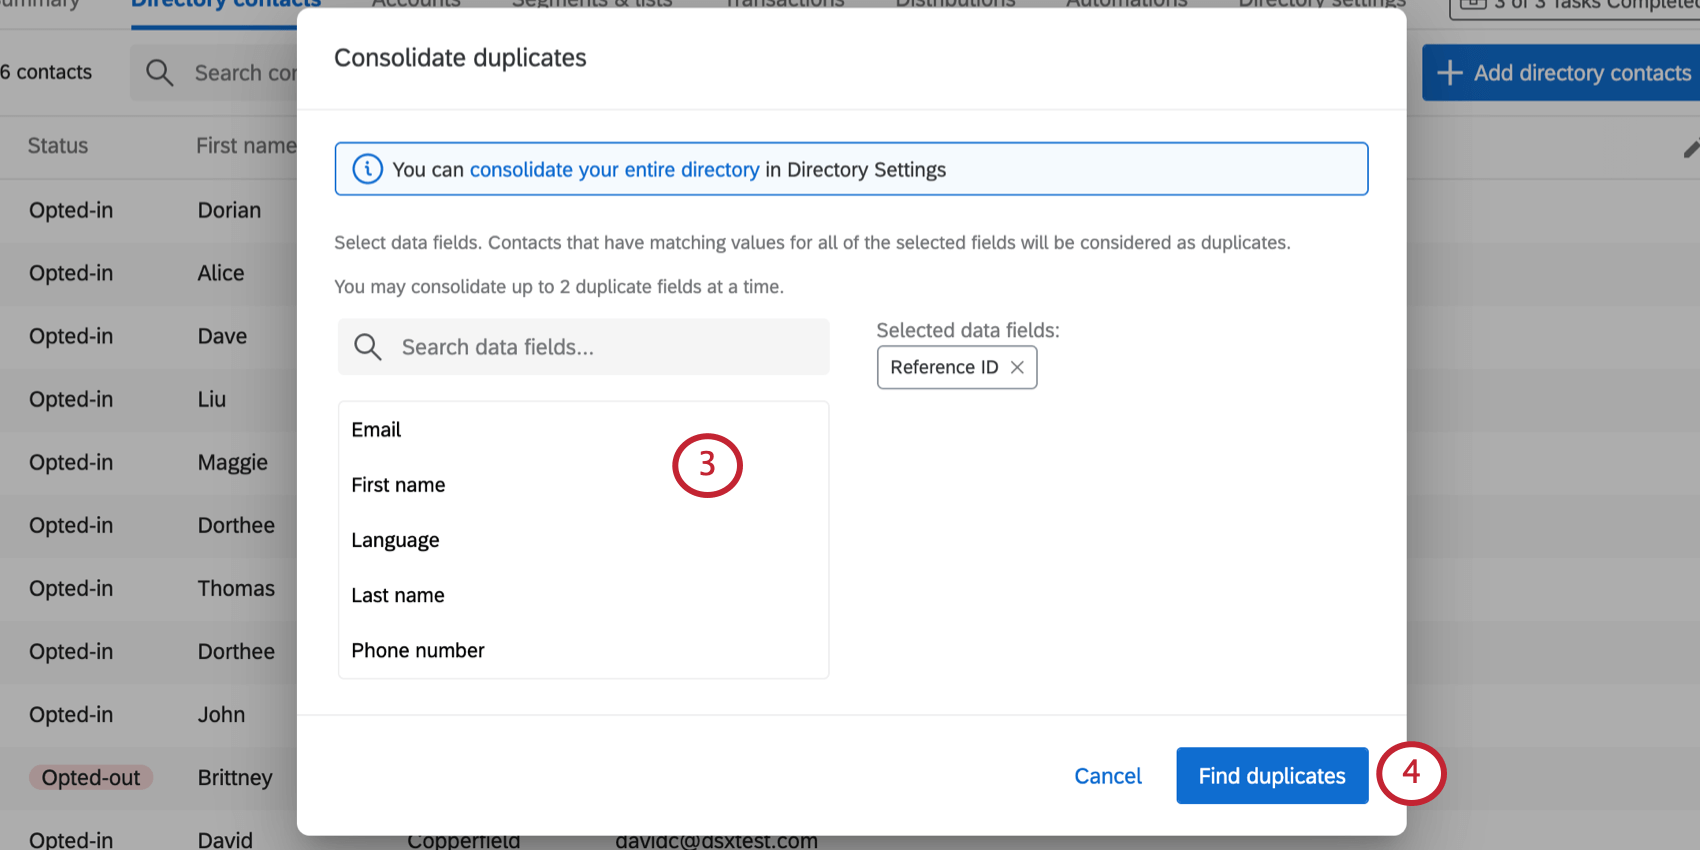 Example: If we select first and last name, contacts with the same first name won’t be considered duplicates. Only if both names match will they be considered duplicates of each other.
 - Click Find duplicates.
- Next to a group of duplicates, click Consolidate.
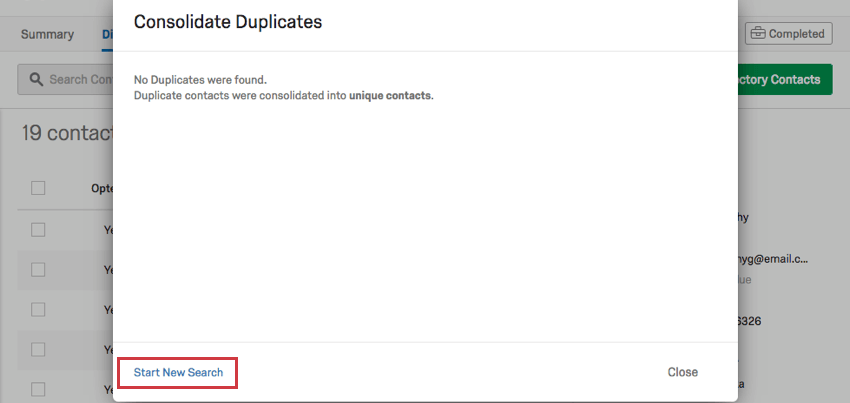
 Qtip: You can only consolidate 100,000 sets of duplicates at a time. In the above image, 2 sets of duplicates were present. If your directory has more than 100,000 sets of duplicates, you will need to consolidate duplicates multiple times. You can also consolidate duplicates in the Directory Settings tab. See Merging Existing Contacts for more information.
 - The differences between the duplicates will be listed. Select the preferred version of each differing field.
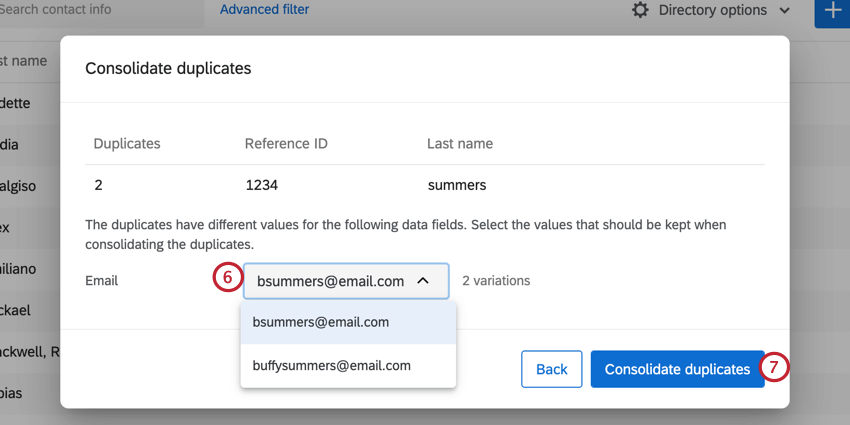
- Click Consolidate duplicates.
Qtip: For all contacts, you can specify the values for contact information (name, email, phone, and language). For embedded data, it depends on the contacts that are being consolidated. If each duplicate contact has different values for an embedded data field, then you will be given the option to choose which embedded data value to keep. If one contact has a value for an embedded data field but the other contact does not have a value for that field, then whichever version of the contact that is selected will determine which non-duplicated field is kept.
Consolidating Additional Duplicates
If you’re finished your search, click Start New Search on the bottom-left to choose different fields for identifying duplicates.
Manage Embedded Data
Manage Embedded Data under Directory options allows you to edit the embedded data fields themselves, not just the values. From this window, you can delete embedded data, rename it, or merge multiple fields.
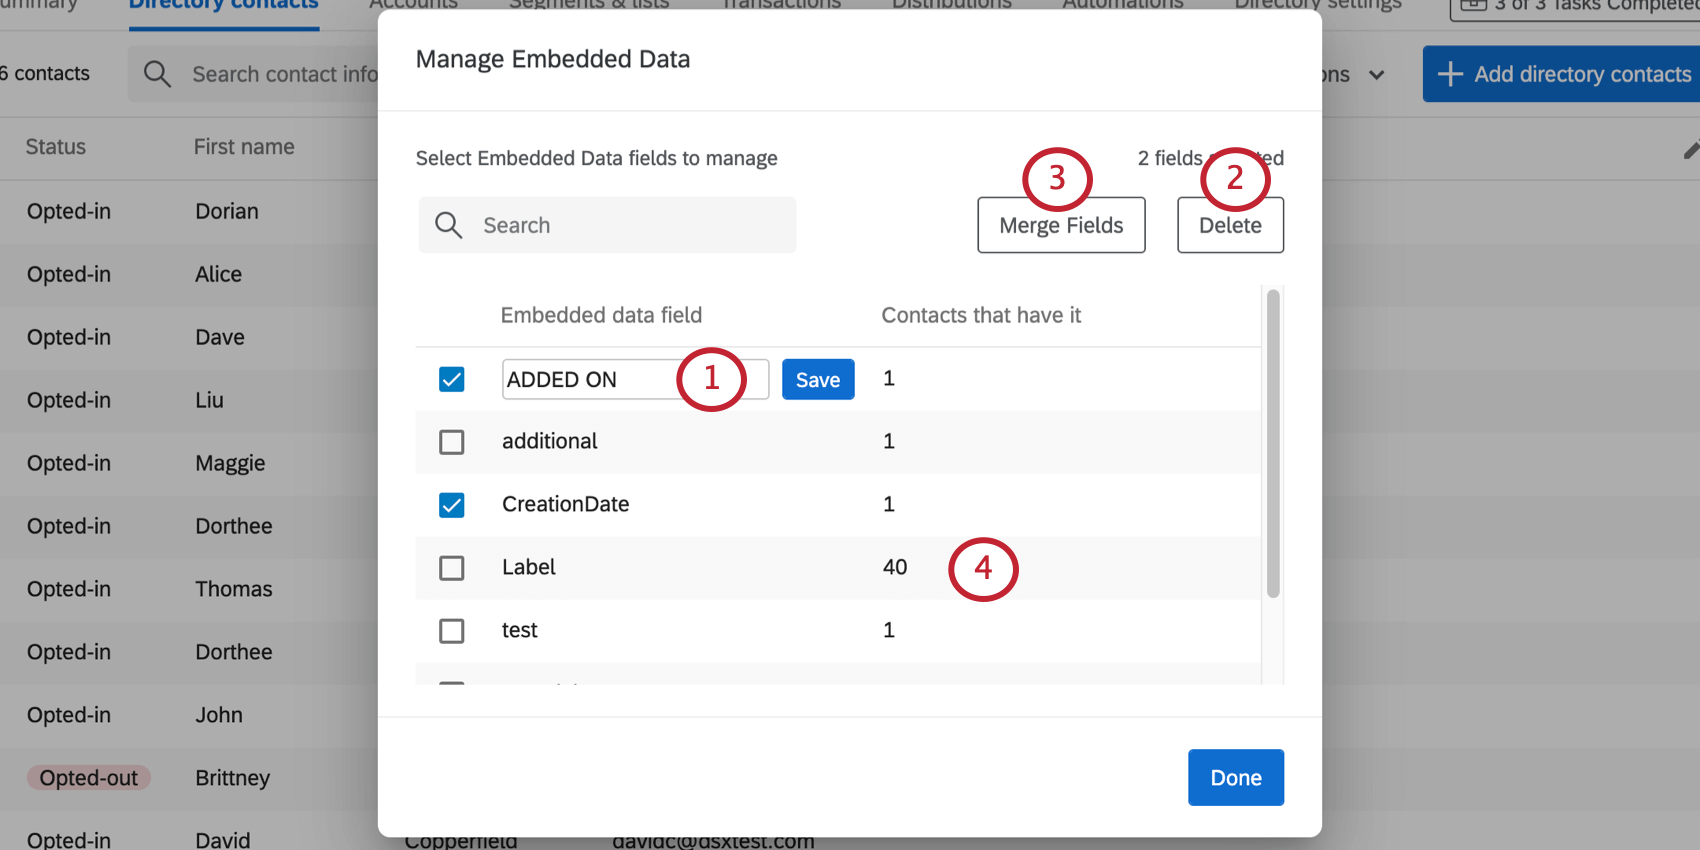
- Renaming Fields: Click into or highlight a field to change its name. Click Save when you’re done.
- Deleting Fields: Select the fields you wish to delete with the checkboxes along the left, then click Delete on the upper-right.
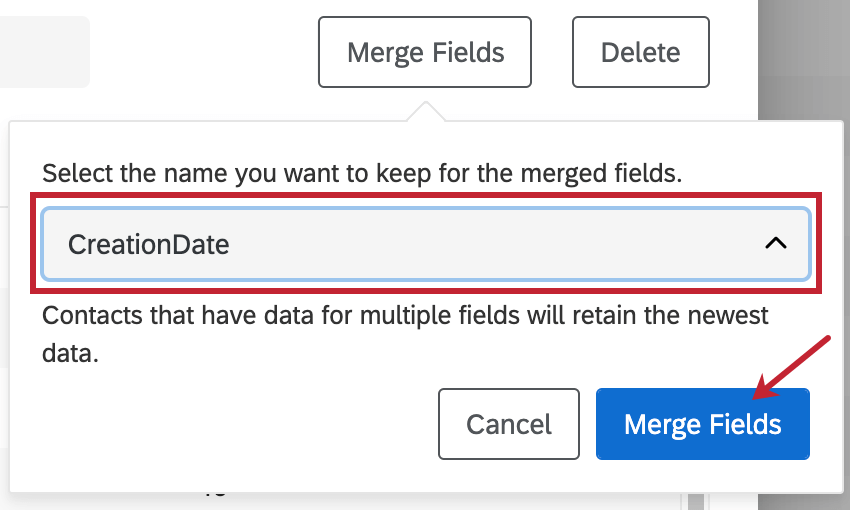
- Merging Fields: Select multiple fields along the left to merge into a single embedded data field. Then click Merge Fields on the upper-right, select the name you want the merged fields to have, and click Merge Fields. If there are multiple values, the newest one added will become the value of the merged field.
 Qtip: This only merges directory fields and does not affect embedded data within survey responses.
 - Contacts that have it: The number of contacts that an embedded data field has assigned to it.
Directory Settings
The Directory settings option will redirect you to the Directory Settings tab. See the following pages for more on the options you can find there: